How to Guide – Pitched Green Roof (Anti-Slip & Retention)
For sloped extensive & semi-extensive roofs (illustration only)
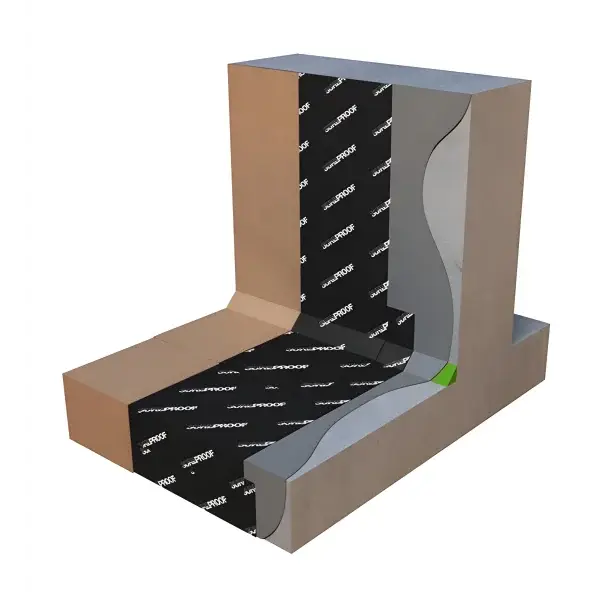
Pitched green roofs need the same core layers as flat systems, plus anti-slip retention to keep the growing medium and vegetation in place. This quick guide outlines the typical build for slopes above ~5° (low pitch) through to steeper roofs, using Wykamol components available from Clever Shield Ltd.

1) Check suitability
- Structure & loading: Verify saturated loads (layers + substrate + vegetation + rain/snow). Engineer sign-off recommended for pitched systems.
- Slope & access: Define safe access and fall protection for installation and maintenance.
- Drainage & overflows: Ensure free discharge to outlets/eaves; add inspection/access points where possible.
- Wind & fire: Design perimeter fire-breaks and wind-uplift restraint per project standards.
2) What you’ll need:
- Primary waterproofing: Wykamol Sureproof Waterproofing Membrane (self-adhesive Type A) where specified for the deck.
- Protection/filtration layer: Wykamol Geotexile Drainage & Protection Membrane (protection + filter for podium/roof build-ups).
- Drainage with bonded filter: Wykamol CM8 Geotextile Membrane 2m × 20m (preferred drainage layer on pitched systems).
- Higher void capacity (where designed): Wykamol CM20 Geotextile Membrane 2m × 10m.
- Edge restraint/terminations: Geotextile Membrane Profile Strip 2m for neat edges and to form perimeter gravel zones.
- Growing medium & planting: Certified lightweight green-roof substrate; sedum mats/trays or plugs/wildflower mix to specification.
- Retention aids (project-specific): Timber/aluminium battens or retention grids/strips fixed per design (spacing based on slope and load).
- Optional: Drip irrigation for semi-extensive mixes; outlet inspection boxes; eaves/gravel stop profiles.
3) Fast build sequence (illustration only)
- Prepare the roof: Repair defects; check fixings, eaves details and overflows. Confirm slopes.
- Primary waterproofing: Install/verify a continuous, tested membrane (e.g., Sureproof). Detail upstands, penetrations and eaves.
- Protection/filter layer: Loose-lay Geotex Drainage & Protection Membrane; lap/tape per data sheet. Turn up at upstands above finished level.
- Drainage layer: Roll out CM8 Geotextile (geotextile face up) from ridge to eaves; lap neatly and keep water paths clear to eaves/outlets. For higher capacity, use CM20 Geotextile where designed.
- Edge restraint & eaves details: Fix Profile Strips; form 300–500 mm gravel margins at perimeters, valleys and penetrations for fire breaks and maintenance.
- Install retention aids: Fit pitched-roof battens/grids on top of the drainage layer at designed centres across the slope to retain substrate. Seal any fixings through waterproofing with system-approved details.
- Substrate: Place certified lightweight substrate evenly to the specified depth (typ. extensive ~60–120 mm; semi-extensive ~100–200 mm), working uphill between retention rows. Do not block drainage at eaves.
- Vegetation: Lay sedum mats/trays tight to joints, or plant plugs/wildflower mixes per supplier rates. Water thoroughly.
- Final checks: Inspect retention rows, edges and eaves; confirm free drainage; record build-up, depths and retention spacing.
4) Indicative retention spacing (illustration only)
| Roof pitch (°) | Typical approach | Notes |
|---|---|---|
| 5–10° | Retention rows at wider centres | Substrate depth per planting; check wind/uplift details. |
| 10–20° | Closer retention centres; consider anti-slip grids | Irrigation advisable for semi-extensive mixes. |
| >20° | Engineered system (grids + anchors) | Engineer design required; enhanced edge/wind detailing. |
Spacing, fixings and component choice must be confirmed by the project designer/engineer and manufacturer data sheets.
5) Tips & common pitfalls
- Wrong layer order: Keep drainage with bonded geotextile above protection and below substrate. Do not bury inspection points.
- Insufficient retention: Increase retention rows as pitch increases; verify fixings and substrate depth.
- Blocked eaves: Maintain gravel margins and keep geotextile clear of outlets.
- Wind & fire: Use perimeter gravel/fire breaks and secure edge trims per guidance.
Product availability
Clever Shield Ltd supplies Wykamol Sureproof Waterproofing Membrane, Wykamol Geotex Drainage & Protection Membrane, Wykamol CM8 Geotextile Membrane, Wykamol CM20 Geotextile Membrane, and Geotextile Membrane Profile Strips, plus certified substrates, sedum mats/trays and retention accessories. Use the website search to select sizes and kits for your pitched roof project.