How to Install Wykamol CM20 Membrane
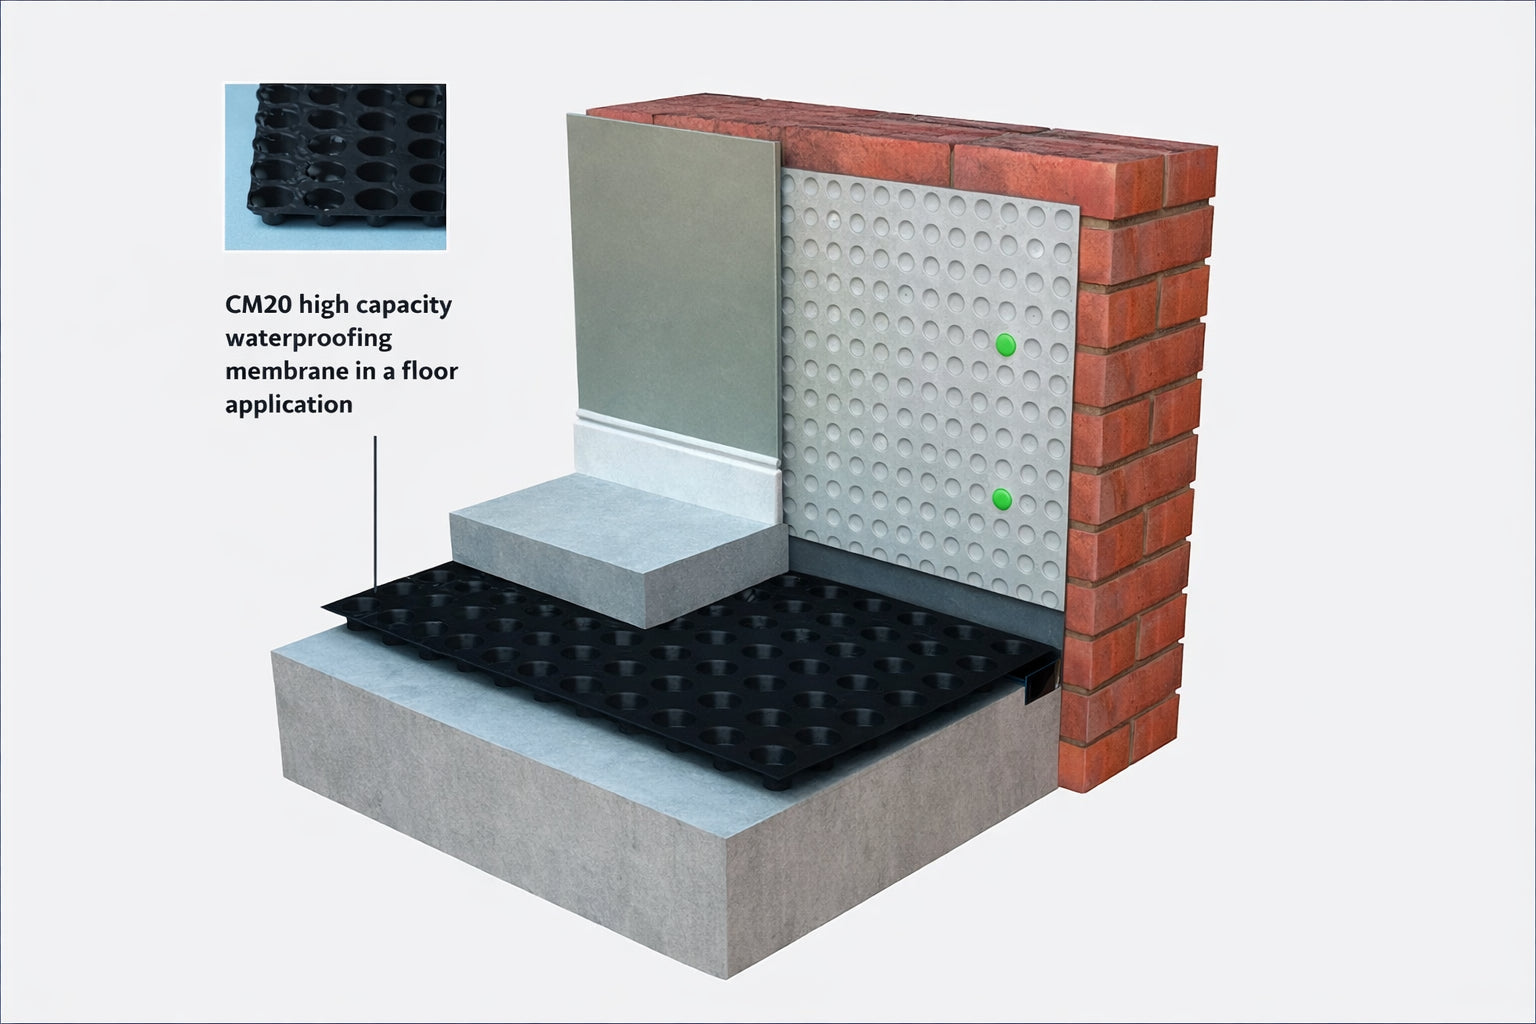
High-capacity cavity drain installation — CM20 walls & floors (illustration only)
⚠️ Important Disclaimer:
This guide is provided for illustration purposes only. It is not an installation manual and does not replace manufacturer instructions, professional design, or building regulations. Site conditions vary. Clever Shield Coatings Ltd accepts no liability for actions taken based on this information. Always follow current product data sheets, BS 8102 principles and consult competent professionals.
This guide is provided for illustration purposes only. It is not an installation manual and does not replace manufacturer instructions, professional design, or building regulations. Site conditions vary. Clever Shield Coatings Ltd accepts no liability for actions taken based on this information. Always follow current product data sheets, BS 8102 principles and consult competent professionals.
1. Introduction
Wykamol CM20 is a high-capacity, 20 mm stud HDPE cavity drain membrane used primarily in Type C drained waterproofing systems. Its deeper studs provide increased water movement and storage, making it ideal for basements, floors, and walls where higher ingress is anticipated. CM20 is normally combined with perimeter channels and a sump & pump to manage and discharge water safely.

2. Product Overview
- Type: 20 mm studded HDPE cavity drain membrane (plain face)
- Use: Part of a drained protection system to manage water behind finishes
- Key benefit: High flow capacity compared with thinner membranes (e.g., CM8)
- Typical finishes: Floating floors over CM20; independent stud/liner systems on walls
3. Safety & Preparation
- Survey/design: Confirm target performance grade, routes to discharge, access/maintenance points, and power for pumps.
- Substrate: Remove debris and sharp projections; ensure the base is reasonably level and sound.
- Repairs: Address obvious structural defects and service penetrations before lining.
- PPE: Gloves, eye protection and dust control where cutting/drilling are required.
4. Tools & Materials
- Wykamol CM20 membrane rolls
- Perimeter drainage channel with access/flush points
- Membrane plugs and sealing washers (for wall fixings)
- Sealing tapes and sealing rope for joints and interfaces
- Compatible discharge pipework, non-return valve, sump & pump kit
- Knife/shears, tape measure, straightedge, drill and suitable bits
- Temporary weights/sandbags for floor consolidation if needed
5. Layout & Cutting
- Plan sheet runs to minimise joints and avoid narrow strips at edges and corners.
- Cut with a sharp knife or shears; keep edges straight for reliable sealing.
- Pre-plan penetrations and details around columns, steps and thresholds.
6. Jointing & Interfaces
- Sheet joints: Align neatly; seal with compatible tapes. Maintain clean, dry contact areas.
- Floor upstand: Turn CM20 up the wall typically 50–100 mm to create a tray before wall lining.
- Transitions: Seal interfaces between floor CM20, perimeter channel and wall membranes using tapes/rope per the system design.
- Penetrations: Sleeve and seal around services to maintain continuity.
7. Perimeter Channel
- Install channel at the wall–floor junction to collect water from membranes and deliver it to the sump.
- Set channels level and include access/flush points at sensible intervals for maintenance.
- Ensure a clear path from every lined area to the channel; avoid dead-ends.
8. Floor Installation (CM20 studs-down)
- Clean and prepare the slab; remove sharp points and debris.
- Lay CM20 studs-down, forming sealed joints between sheets with compatible tapes.
- Turn upstands to the wall and lap/terminate at the perimeter channel per design.
- Use light, even pressure or temporary weighting to bed sheets flat; avoid crushing studs.
- Protect the membrane promptly with the specified floor build-up (e.g., insulation/overlay or screed as designed).
9. Wall Installation (where CM20 is specified)
- Offer CM20 to the wall with studs to the substrate and flat face inward.
- Drill through the membrane and fix using plugs and sealing washers at appropriate centres (often 200–250 mm; adjust for substrate and curvature).
- Seal vertical and horizontal joints with compatible tapes; ensure a sealed junction to the floor upstand/channel.
- Finish with an independent lining (timber/metal studs and board) rather than direct plastering.
10. Sump, Pump & Discharge
- Install the sump chamber, pump(s), and non-return valve as designed. Provide a compliant discharge route.
- Electrical connections and alarms must be installed and tested by a competent, qualified person.
- Commission by water testing: verify pump start/stop levels, check joints for leaks, and record settings.
11. Finishes & Build-Ups
- Floors: Floating floor build-ups (e.g., insulation + board) or screed overlays as specified. Observe curing and loading limits.
- Walls: Independent stud/liner system with plasterboard or other suitable finishes. Maintain gaps and avoid bridging to damp substrates.
- Allow adequate drying/conditioning before decoration. Use compatible finishes per design requirements.
12. Quality Checks & Maintenance
- Confirm all joints and interfaces are sealed; rectify pinholes or gaps immediately.
- Keep inspection points accessible; implement a service schedule for channels and pumps.
- Record commissioning data (pump levels, alarm tests) and retain for future maintenance.
13. Product Availability
All components referenced—Wykamol CM20 membrane, perimeter channel, membrane plugs & washers, tapes & sealing rope, and sump & pump kits—are available directly from Clever Shield Coatings. Use the website search bar or browse our product categories to locate the items you need.
⚠️ Legal Notice:
This content is a general, illustrative overview. It is not manufacturer guidance and may not suit all properties. Specifications, regulations and recommended methods can change. Clever Shield Coatings Ltd provides this information “as-is” without warranty. Always follow current product data sheets, BS 8102 principles and consult qualified professionals before commencing work.
This content is a general, illustrative overview. It is not manufacturer guidance and may not suit all properties. Specifications, regulations and recommended methods can change. Clever Shield Coatings Ltd provides this information “as-is” without warranty. Always follow current product data sheets, BS 8102 principles and consult qualified professionals before commencing work.